Cooling is essential for maintaining the performance and longevity of your PC components. Ensuring proper airflow in your case is one of the simplest and most effective ways to achieve this. In this guide, we'll explore how to run fans on a PC case to optimize cooling and prevent overheating, using efficient fan placement, connection, and control techniques.
The first step in running fans on a PC case is determining the optimal airflow setup. Your goal is to create a balanced airflow system where cool air enters the case and hot air is expelled efficiently.

Intake Fans: Positioned at the front or bottom of the case to pull cool air in.
Exhaust Fans: Located at the rear or top to expel hot air.
Positive Pressure: More intake fans than exhaust, reducing dust buildup but possibly retaining heat.
Negative Pressure: More exhaust fans than intake, removing hot air faster but increasing dust intake.
Balanced Pressure: Equal number of intake and exhaust fans, offering a good balance between cooling and dust control.
Front/Bottom: Intake fans to draw in cool air.
Top/Rear: Exhaust fans to push out hot air.
Once you've planned your configuration, it's time to install the fans.
Screwdriver (for mounting fans)
Screws (usually included with the case or fans)
Fan grills (optional, for protection and aesthetics)
Position the Fan: Place the fan with the airflow arrows pointing in the desired direction (into the case for intake, out for exhaust). Most fans have arrows indicating airflow direction.
Secure the Fan: Use screws to securely mount the fan onto the designated slots inside the case.
Repeat: Follow the same process for all fans you want to install.
Fans need to be powered and controlled, which you can achieve by connecting them to your motherboard or power supply.

3-pin Fans: Can be connected to any 3-pin or 4-pin fan header. However, 3-pin fans offer limited speed control.
4-pin PWM Fans: Offer precise speed control through Pulse Width Modulation (PWM). Connect to a CPU_FAN or SYS_FAN header on the motherboard.
If you have more fans than available headers on the motherboard, you can connect additional fans to the power supply using Molex connectors. However, this setup doesn’t offer speed control.
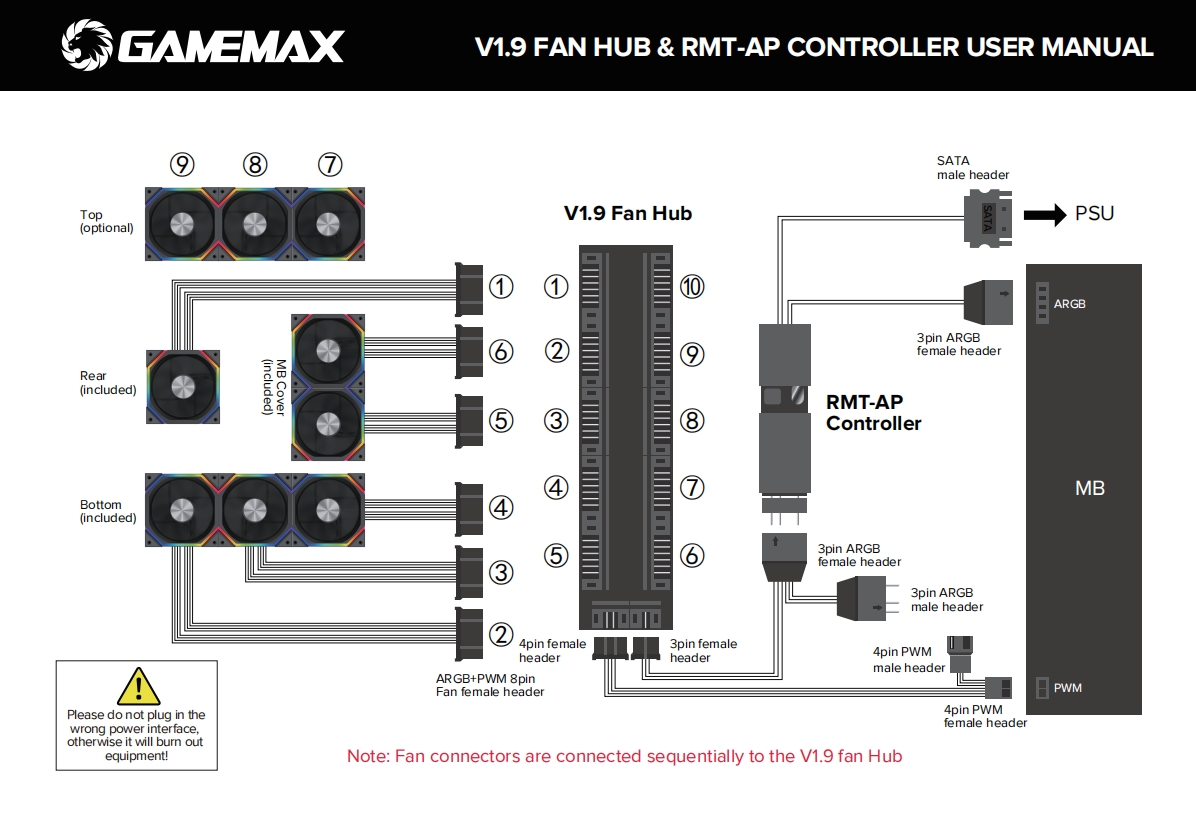
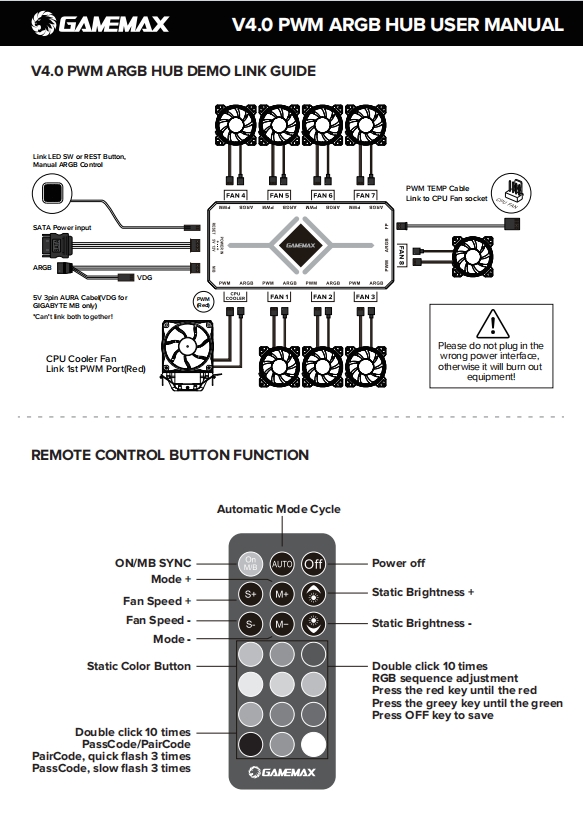
If your motherboard has limited fan headers, you can use a fan hub or splitter to expand the number of fans you can connect.
Fan Hub: Allows multiple fans to be powered and controlled through a single motherboard header.
Fan Splitter: Connects multiple fans to a single header, but be mindful of power limits and fan control capabilities.
Once your fans are installed and connected, it’s time to configure the fan speeds for optimal cooling and noise management.
Most modern motherboards offer fan speed control options in the BIOS/UEFI:
Enter BIOS: Restart the computer and press Delete or F2 to enter the BIOS during boot.
Navigate to Fan Control: Locate the fan settings, usually under "Hardware Monitoring" or "Fan Speed Control."
Select Fan Profiles: Choose from preset profiles like "Silent," "Normal," "Performance," or create a custom fan curve based on temperature.
Many manufacturers provide software for fan control within Windows (e.g., ASUS Fan Xpert, MSI Dragon Center). This software allows you to adjust fan speeds, create profiles, and monitor temperatures in real-time.
SpeedFan is a popular third-party tool that offers more in-depth fan control options if your BIOS or manufacturer’s software is limited.

After setting up your fans, it's important to monitor your PC's temperatures and make adjustments as necessary to ensure optimal performance.
HWMonitor, Core Temp, or MSI Afterburner allow you to monitor CPU, GPU, and system temperatures.
Adjust fan speeds based on the temperatures to find a balance between cooling performance and noise.
If your components are running too hot (especially the CPU and GPU), increase fan speed or add additional fans.
If the system is too noisy, experiment with fan profiles or reduce the number of fans to maintain quieter operation while ensuring adequate cooling.
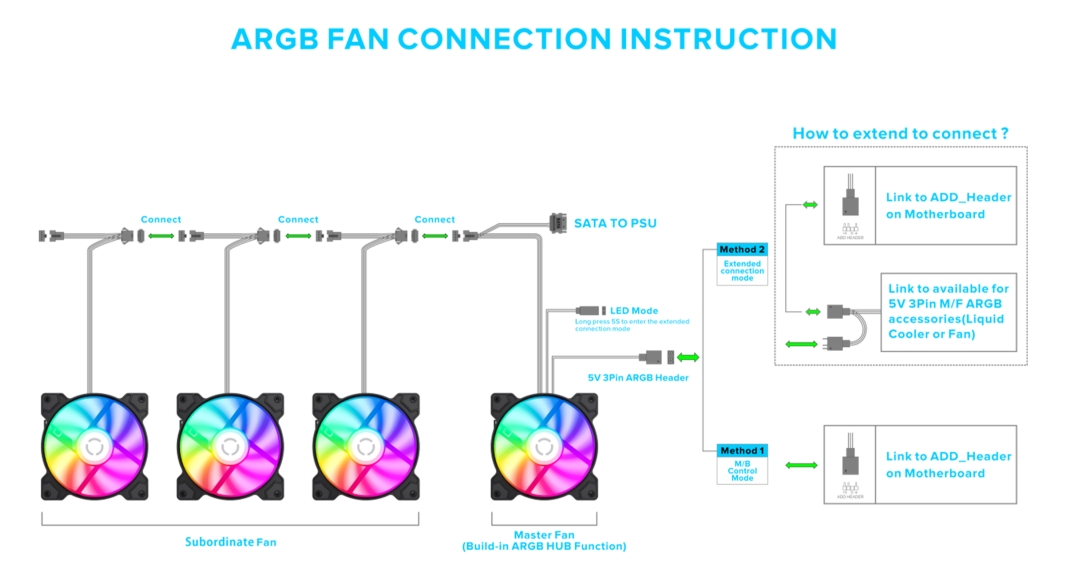
If you're using RGB or ARGB fans, you'll need to connect them to your motherboard’s RGB or Addressable RGB headers for lighting control.
RGB (12V 4-pin): Non-addressable RGB fans connect to 12V RGB headers and can display a single color across all LEDs.
ARGB (5V 3-pin): Addressable RGB fans allow for more dynamic lighting effects and connect to the 5V ARGB headers.
Use software like ASUS Aura Sync, MSI Mystic Light, or Gigabyte RGB Fusion to control the lighting effects and synchronize them with other RGB components.
Running fans on a PC case is crucial for keeping your system cool and running efficiently. By properly planning fan placement, connecting them to the motherboard or power supply, and configuring the fan speeds, you can maintain a well-cooled and quiet PC setup. Don’t forget to monitor temperatures and make adjustments as needed to ensure peak performance while keeping noise to a minimum.