

Windows 11 has brought a fresh look and new features to the Windows ecosystem. If you're eager to experience it on your PC and plan to install it from a USB drive using the Media Creation Tool, this step-by-step guide is for you. Installing Windows 11 via USB can be a great option, whether you're setting up a new computer, performing a clean install, or troubleshooting issues with your current system.
Before you begin the installation process, make sure you have the following:
A Suitable USB Drive: You'll need a blank USB flash drive with at least 8 GB of space. Note that the process will format the USB drive, so ensure there are no important files on it. Back up any data present on the USB drive before proceeding.
A Compatible PC: The computer on which you intend to install Windows 11 must meet the minimum system requirements. These include a 1 gigahertz (GHz) or faster processor with two or more cores on a compatible 64-bit processor or System on a Chip (SoC), 4 GB of RAM, 64 GB or larger storage device, a DirectX 12 compatible graphics card with WDDM 2.0 driver, and a high-definition (720p) display that is greater than 9 inches diagonally, 8 bits per color channel. Also, ensure your PC has a USB port to connect the drive.
Internet Connection: You need a stable internet connection on the computer where you'll be downloading the Media Creation Tool and creating the installation media. This is required to download the Windows 11 files.
Open your web browser and navigate to the official Microsoft Windows 11 download page. You can do this by searching for "Windows 11 download" in your preferred search engine and then selecting the official Microsoft link from the search results.
On the Windows 11 download page, look for the section labeled "Create Windows 11 installation media". Click the "Download now" button. This will start the download of the Media Creation Tool, which is an executable file named something like "MediaCreationToolW11.exe". The size of the file is relatively small, but the actual download of Windows 11 files will occur later during the creation of the installation media.
Locate the downloaded "MediaCreationToolW11.exe" file on your computer. It is usually in the "Downloads" folder, but the location may vary depending on your browser settings.
Double-click on the "MediaCreationToolW11.exe" file to run it. If you are prompted by the User Account Control (UAC) asking if you want to allow this app to make changes to your device, click "Yes". This is a security measure to ensure that only authorized programs can make changes to your system.
The Media Creation Tool will start, and you'll be presented with the "Windows Setup" window. Read the "Applicable notices and license terms". If you agree, click the "Accept" button to proceed.
On the "What do you want to do?" screen, select the option "Create installation media (USB flash drive, DVD, or ISO file) for another PC". This option is crucial as it allows you to create a USB drive that can be used to install Windows 11 on another computer. Click "Next".
You'll then be asked to choose the language, edition, and architecture (64-bit) for Windows 11. Select your preferred language from the drop-down menu. For the edition, if you have a specific license key for a particular edition (such as Windows 11 Home or Pro), choose the corresponding option. If you're not sure, the "Windows 11 (multiple editions)" option will allow you to choose the edition during the actual installation process. Ensure that "64-bit (x64)" is selected for the architecture, as most modern computers support 64-bit operating systems. Click "Next" once you've made your selections.
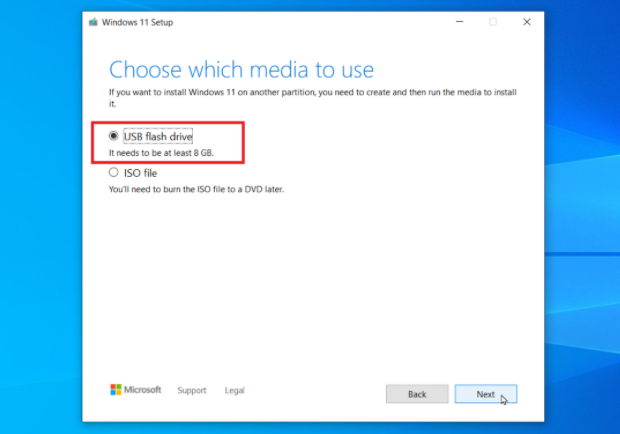
In the "Choose the media you want to use" section, select "USB flash drive" as the destination for your Windows 11 installation media. Click "Next".
Connect the USB drive to your computer if you haven't already. The Media Creation Tool will detect the connected USB drives. Select the USB drive that you want to use for the installation media from the list. Make sure you select the correct drive, as all data on the selected drive will be erased during the process. Click "Next".
The Media Creation Tool will now start downloading the Windows 11 files and creating the installation media on the USB drive. This process may take some time, depending on your internet speed and the performance of your computer. You'll see a progress bar indicating the status of the download and creation process.
Do not disconnect the USB drive or turn off your computer during this process. If there are any issues during the download or creation, such as a network interruption, the tool may prompt you to try again.
Once the Windows 11 installation USB has been successfully created, safely eject the USB drive from the computer where you created it.
Connect the USB drive to the computer on which you want to install Windows 11.
Restart the target computer. As the computer boots up, you need to access the boot menu. The key to access the boot menu varies depending on the computer's manufacturer. Common keys include F2, F12, Delete, or Esc. Look for a message on the screen during the boot process that indicates which key to press.
In the boot menu, select the USB drive as the first boot device. Use the arrow keys to navigate to the USB drive option and press Enter. This will ensure that the computer boots from the USB drive and starts the Windows 11 installation process.
After the computer boots from the USB drive, you'll see the Windows Setup screen. Select your language preferences, such as language, time and currency format, and keyboard layout. Click "Next".
Click the "Install now" button.
If you have a Windows 11 product key, enter it at this stage. If you don't have a key, you can skip this step for now. However, keep in mind that some editions of Windows 11 may require activation later.
Select the type of installation you want. If you want to perform a clean install, which erases all data on the hard drive and installs a fresh copy of Windows 11, select "Custom: Install Windows only (advanced)". If you want to upgrade an existing Windows installation, select the appropriate upgrade option (although this option may not be available in all cases).
On the "Where do you want to install Windows?" screen, select the partition on your hard drive where you want to install Windows 11. If it's a new hard drive or you want to format the existing partition, you can also select the partition and click "Drive options (advanced)" to perform tasks like formatting or creating new partitions. Click "Next" to start the installation.
The Windows 11 installation process will now begin. The computer will copy files, install features, and configure settings. This process will take several minutes, and the computer may restart multiple times. Do not interrupt the process.
Once the installation is complete, you'll be prompted to set up your Windows 11 environment. This includes creating a user account, setting up network connections, and customizing privacy settings. Follow the on-screen instructions to complete these steps.

