

If your computer has started using the Windows installation media unexpectedly while trying to install or upgrade to Windows 11, this can be a frustrating issue. This article will explore the possible causes and provide you with solutions to fix this problem.
When you see the message "The computer started using Windows installation media," it means that your computer is attempting to boot from the Windows installation media (such as a USB drive or DVD) instead of its internal hard drive where the operating system is installed. This can occur during a Windows installation, upgrade, or even during normal startup if there are certain issues with the system's boot configuration.
Incorrect Boot Order: The boot order in your computer's BIOS or UEFI settings may be misconfigured. If the Windows installation media is set as the first boot device, the computer will try to boot from it instead of the internal hard drive.
Removable Media Connected: Your computer may be set by default to boot from removable media such as USB drives or DVDs. If any of these media are connected to your computer while starting up, the system might try to boot from them.
Damaged or Corrupt Boot Loader: The boot loader, which is responsible for starting the operating system, may be damaged or corrupted. This can happen due to various reasons, such as improper shutdowns, disk errors, or malware infections.
Hardware or Connection Issues: In some cases, hardware problems or faulty connections can cause the computer to incorrectly detect or prioritize boot devices, leading to the error message.
Restart your computer and press the key (usually Del, F2, F10, or Esc) to enter the BIOS or UEFI setup. The key to press is usually displayed on the screen during startup.
In the BIOS or UEFI setup, look for the "Boot" section. Here, you can see the list of boot devices and their order.
Make sure that the internal hard drive (usually labeled as "HDD," "SSD," or with the brand name of your drive) is set as the first boot device. You can use the arrow keys to select the device and the " + " or " - " keys (or other specified keys) to change the order.
Save the changes and exit the BIOS or UEFI setup. Usually, you can press F10 to save and exit.
If you have any USB drives, DVDs, or other removable media connected to your computer, disconnect them.
Restart your computer and see if it boots normally without the error message.
Press the Windows key + R to open the Run dialog box.
Type "regedit" and press Enter to open the Registry Editor.
In the Registry Editor, navigate to the following key: HKEY_LOCAL_MACHINE\SYSTEM\CurrentControlSet\Control
Under the "Control" key, look for a key named "Minint". Right - click on the "Minint" key and select "Permissions".
Select your username under the "Users or groups" section and check the "Full control" checkbox under "Permissions for...". Then click "OK" to apply the changes.
Now, right - click on the "Minint" key again and select "Delete". Confirm the deletion in the dialog box that appears.
Restart your computer and try the Windows installation or upgrade again.
Insert the installation media (USB drive or DVD) into your computer.
Restart your computer and boot from the installation media. You may need to press a specific key during startup to select the boot device.
Set up the language, time, and date settings as prompted.
When asked for a Windows activation key, if you don't have it, click on "I don't have a product key".
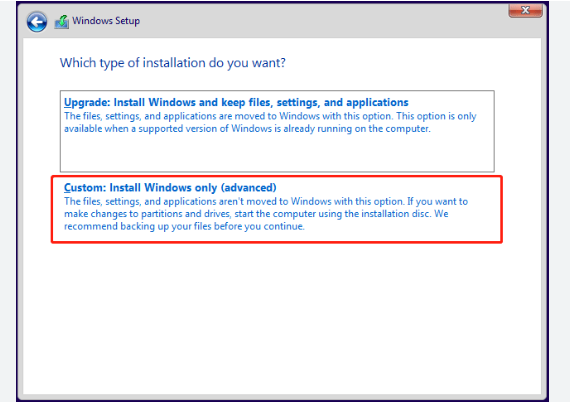
Follow the setup process until you reach the "Which type of installation do you want?" screen. Select the "Custom" option to perform a clean install.
On the "Where do you want to install Windows?" screen, you will see a list of partitions. Choose each partition that has the current operating system's system files on it and click on "Delete".
Select the partition where you want to install Windows and follow the on - screen instructions to complete the installation.
If you have a Windows 11 installation media (USB drive or DVD), insert it into your computer and restart.
Boot from the installation media.
On the Windows Setup screen, click on "Next". Then click on "Repair your computer".
In the "Choose an option" screen, select "Troubleshoot".
In the "Troubleshoot" screen, select "Advanced options".
Select "Command Prompt".
In the Command Prompt, type the following commands one by one and press Enter after each command:
diskpart
list disk (This will show you a list of disks in your computer. Identify the disk where Windows is installed. It is usually disk 0)
select disk 0 (Replace 0 with the actual disk number if it's different)
list volume (This will show you a list of volumes on the selected disk)
Identify the EFI system partition (usually a small partition with the FAT32 file system). Note its volume number.
select volume <volume number> (Replace <volume number> with the actual volume number of the EFI system partition)
assign letter = X (Replace X with a drive letter that is not in use. This will assign a drive letter to the EFI system partition)
exit
Now, type the following commands to repair the boot loader:
X:\EFI\Microsoft\Boot\bootrec /FixMbr
X:\EFI\Microsoft\Boot\bootrec /FixBoot
X:\EFI\Microsoft\Boot\bootrec /RebuildBcd
Check the manufacturer's website of your computer or motherboard for the latest BIOS/UEFI version.
Download the BIOS/UEFI update file. Make sure to follow the manufacturer's instructions carefully when updating the BIOS/UEFI, as incorrect updating can cause serious problems to your computer.
Update the BIOS/UEFI and then try to install or upgrade Windows again.

