

Your PC's power supply unit (PSU) is the heart of your computer, delivering the necessary power to all components. But like any part, it can run into issues, and sometimes you may want to check if it’s functioning properly. Whether you're troubleshooting a problem or just making sure your PSU is up to the task, knowing how to check it is essential. In this guide, we’ll go over simple ways to check your PC power supply and when you should consider replacing it.
The PSU converts the electricity from your wall outlet into a form your computer can use. It distributes power to the motherboard, CPU, GPU, and other components. If the PSU fails or isn’t providing enough power, it can cause all sorts of problems, from random shutdowns to failure to boot.
There are several reasons why you might want to check your power supply:
PC Won’t Turn On: One of the most common signs of a PSU problem is a computer that won’t power up at all.
Random Crashes or Reboots: If your computer keeps shutting down unexpectedly, the PSU might not be delivering enough power.
Unusual Noises: Clicking, buzzing, or other strange sounds coming from the PSU are signs it may be struggling or failing.
Upgrading Components: If you’ve recently added new hardware like a powerful graphics card, you may need to ensure your PSU can handle the extra load.
Before diving into more technical checks, start by making sure everything is properly connected. Sometimes, the problem is as simple as a loose cable. Here’s what to do:
Power Cord: Check if the power cord is securely plugged into both the wall outlet and the back of the PSU.
Internal Cables: Open your PC case and ensure that the PSU cables are properly connected to the motherboard, CPU, GPU, and other components.
Power Button: Make sure your power button on the front of the case is functioning properly. Sometimes the switch can be the problem.
A PSU tester is an easy and safe way to check if your power supply is working properly. Here’s how to use it:
Step 1: Shut down your PC and unplug it from the wall.
Step 2: Disconnect the PSU cables from the motherboard and other components.
Step 3: Plug the PSU’s 24-pin connector (the large one) into the PSU tester.
Step 4: Turn on the PSU using the switch on the back (if it has one).
Step 5: The tester will light up and display information. If the PSU is working correctly, the voltage readings will be within a normal range (typically 12V, 5V, and 3.3V). If there’s a problem, the tester will alert you.
PSU testers are inexpensive and straightforward, making them an excellent tool for quickly diagnosing power supply problems.
If you don’t have a PSU tester, you can manually check if the PSU is turning on using the paperclip test. Here’s how to do it:
Step 1: Shut down your PC and unplug it.
Step 2: Unplug the PSU from all internal components (motherboard, GPU, etc.), but leave it plugged into the wall.
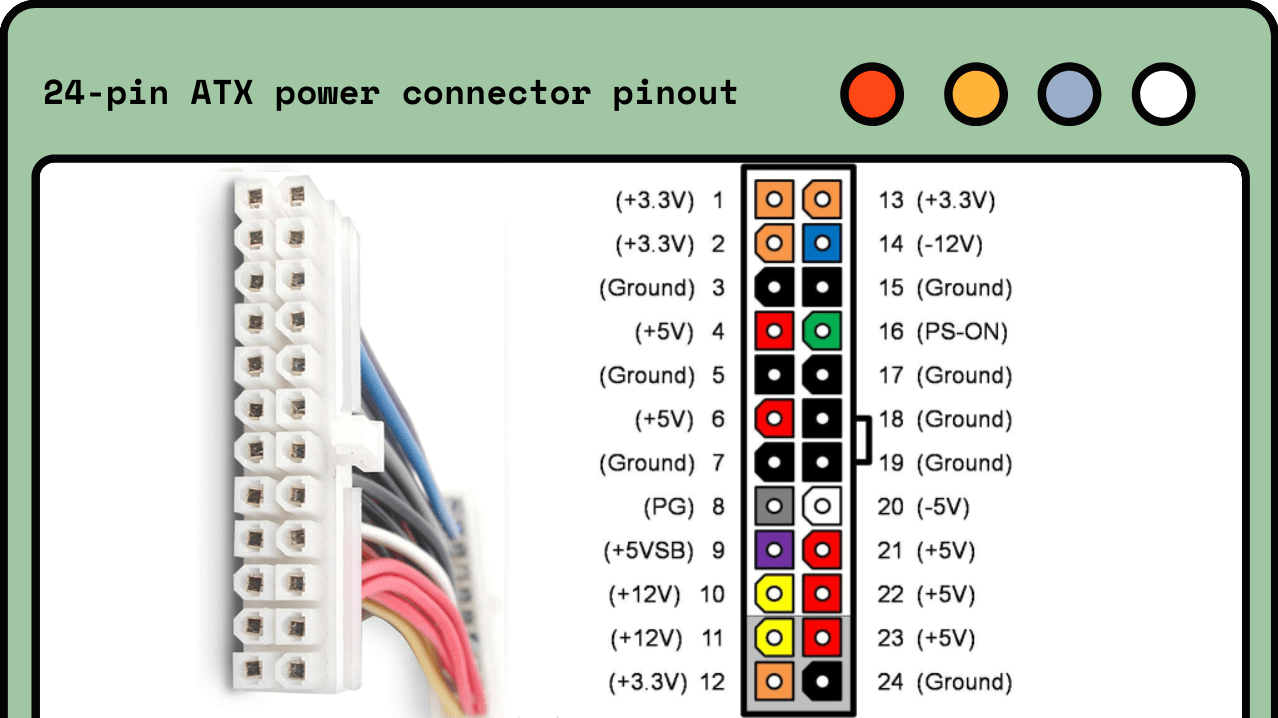
Step 3: Find the 24-pin connector (the large one) coming from the PSU.
Step 4: Take a paperclip and bend it into a U shape.
Step 5: Insert one end of the paperclip into the green wire pin (this is the power signal), and the other end into any of the black wire pins (these are the ground).
Step 6: Turn on the PSU with the switch on the back.
If the PSU’s fan spins up, it’s getting power. However, this test doesn’t tell you if it’s delivering the correct voltage, so it’s more of a basic functionality check.
Important: Be careful when performing the paperclip test. Make sure the PSU is not connected to any components, and handle the cables safely.
If your PSU is functional but your PC still has issues, the problem might be that your PSU doesn’t provide enough power for your components. This is especially common when upgrading to more power-hungry parts, like a new graphics card. You can check if your PSU has enough wattage for your build by following these steps:
Step 1: Calculate the total power your components require. You can use online PSU calculators that let you input your hardware (CPU, GPU, RAM, etc.), and they’ll estimate how much power your system needs.
Step 2: Check your PSU’s wattage, which is usually printed on a label on the PSU itself.
Step 3: Make sure your PSU’s wattage is at least 20-30% higher than your system’s requirements. This gives you a safety buffer and ensures your PSU isn’t running at full capacity all the time.
Another way to check if your PSU is working correctly is through your PC’s BIOS. Here’s how:
Step 1: Restart your PC and enter the BIOS (usually by pressing F2, Delete, or Esc during startup).
Step 2: Navigate to the section that shows your system's hardware information (often called "Hardware Monitor" or "PC Health Status").
Step 3: Look for the voltage readings for the 12V, 5V, and 3.3V rails. These numbers should be close to their respective values. If they’re way off, it could indicate a problem with your PSU.
If your PSU is overheating or the fan isn’t working properly, it can cause power problems. Here’s how to check:
Listen for Fan Noise: When the PSU is on, listen for the fan. If you don’t hear it, the fan may be malfunctioning.
Touch the PSU: If the PSU feels extremely hot to the touch, it may not be cooling properly, which can shorten its lifespan or cause performance issues.
If you notice any of the following signs, it may be time to replace your PSU:
Frequent crashes or shutdowns: Especially when under load (e.g., playing games or running demanding applications).
Burnt smell or unusual noises: A clear sign that something is wrong internally.
Visible damage: If you see damaged or frayed cables, or rust or burns on the PSU itself, it’s best to replace it.
PSUs typically last 5-10 years, but heavy use, heat, and dust can shorten their lifespan. It’s also a good idea to replace your PSU when upgrading to more powerful components.
Checking your PC’s power supply doesn’t have to be complicated. By following these simple steps—checking connections, using a PSU tester or the paperclip test, and monitoring voltages—you can get a good idea of whether your PSU is functioning properly. Regularly checking your PSU, especially when upgrading parts, ensures your computer runs smoothly and avoids unexpected shutdowns or damage. If your PSU shows signs of wear or failure, replacing it with a high-quality model will keep your system running efficiently for years to come.

