

Reduced Cooling Efficiency
Vertical installation alters the traditional airflow path, potentially decreasing the GPU’s cooling efficiency. In conventional cases, GPU fans exhaust heat directly to the rear of the case, but vertical mounting can trap heat inside the chassis, affecting the GPU and adjacent components (e.g., M.2 SSDs). Tests show that the absence of bottom fans may increase CPU temperatures by 5–10°C, while GPU temperature changes vary by case design.
PCIe Interface Contact Issues
Vertical installation relies on extension cables or riser cards, which may introduce signal attenuation or poor contact. PCIe 3.0 risers can create bandwidth bottlenecks, while low-quality cables or loose connections cause unstable data transmission, leading to in-game stuttering or abnormal benchmark scores.
Physical Stress and Sagging
High-end GPUs often weigh over 1.5kg. Vertical mounting subjects the PCIe slot and GPU PCB to constant gravitational stress, potentially deforming the slot or loosening solder joints. Sagging can also obstruct case airflow, further impairing cooling.
Inadequate Power Supply Stability
Some riser cards lack independent power connectors and rely solely on the motherboard’s PCIe slot (max 75W), insufficient for high-power GPUs. Under full load, inadequate power causes performance throttling or black screens.

Case Airflow Design
Prefer vertically compatible cases: Models like the GAMEMAX T20, designed for vertical mounting, rotate the motherboard 90° and include independent I/O baffles to optimize airflow and reduce interference.
Bottom fan configuration: Install 1–2 bottom intake fans in traditional cases to lower CPU temperatures by 3–5°C and improve GPU backplate cooling.
Water cooling + fan combination: For high-power GPUs (e.g., RTX 4090), pair with a custom loop or GPU water block to keep GPU temperatures below 75°C.
Upgrading Cooling Components
Replace thermal paste and pads: Use high-conductivity thermal paste (e.g., Shin-Etsu 7921) and memory thermal pads to enhance heat dissipation.
Add PCIe slot fans: Install low-noise fans below the GPU to target VRM and memory modules, reducing local temperatures by 8–10°C.

PCIe Riser Card Selection
Prioritize PCIe 4.0: Choose PCIe 4.0 x16 risers (e.g., ASUS Hyper M.2 x16) to minimize signal loss, with performance degradation controlled within 1% in testing.
Anti-interference design: Avoid cables longer than 30cm; opt for shielded cables (e.g., Phanteks vertical mount kits).
Power Supply Optimization
Independent power risers: For GPUs exceeding 200W, use risers with 8-pin power connectors (e.g., JEYI PCIe 4.0 riser) for stable power delivery.
Power supply validation: Use online calculators (e.g., OuterVision) to ensure adequate wattage, leaving a 30% buffer for high-end GPUs (e.g., RTX 4080 requires 750W+).
Interface Contact Checks
Clean gold fingers: Gently erase GPU gold fingers with an eraser to remove oxidation and ensure tight contact with the riser or motherboard slot.
Slot reinforcement: Secure risers with zip ties or metal brackets on older motherboards to reduce vibration-induced loose connections.
GPU Bracket Selection
Adjustable metal brackets: Models like the CoolMoon LED GPU support bracket offer height/angle adjustment to precisely support the GPU midsection, reducing PCB bending by over 50%.
Case-integrated solutions: Some cases (e.g., GAMEMAX T20) include magnetic GPU brackets for easy installation without airflow obstruction.
Case and Motherboard Compatibility
BIOS updates: Update motherboards (e.g., ASUS Z790) to specific BIOS versions for vertical mounting support via UEFI tools or USB Flashback.
Space verification: Measure GPU length and case width before installation to avoid clashes with side panels or water cooling radiators.
Vertical Sync and FPS Limiting
Disable vertical sync: Turn off vertical sync in NVIDIA Control Panel or AMD Software; use Fast Sync (NVIDIA) or Enhanced Sync (AMD) to reduce GPU idle.
FPS cap settings: Use RTX IO or Riva Tuner Statistics Server (RTSS) to limit game FPS to 1.1x the monitor refresh rate for balanced performance and power.
Driver and Firmware Updates
GPU drivers: Install the latest drivers via GeForce Experience or AMD Adrenalin to fix vertical mounting compatibility issues.
Motherboard firmware: Update to the latest BIOS to optimize PCIe lane allocation and power management.
Active Cooling Modifications
Backplate fans: Attach a 120mm fan to the GPU backplate with a PWM controller to lower junction temperatures by 5–8°C.
Case airflow mods: Add dust filters at GPU exhaust ports and clean regularly to prevent cooling degradation.
Stress Testing and Monitoring
Stability testing: Run dual stress tests with FurMark (GPU) and AIDA64 (CPU) to monitor temperature curves and power consumption for throttling signs.
Real-time monitoring: Use HWMonitor or GPU-Z to track PCIe lane speed, voltage, and memory frequency for early issue detection.
Long-Term Maintenance Plan
Quarterly checks: Clean case dust, re-seat the GPU and riser, and inspect for oxidation.
Annual deep maintenance: Replace thermal paste/pads, check bracket support, and replace aging components as needed.
Issue 1: Excessive GPU Temperature
Solution: Verify bottom fan operation; test with the side panel open. If still hot, replace thermal paste or upgrade to water cooling.
Issue 2: Unstable In-Game FPS
Solution: Cap FPS with RTX IO/RTSS; check riser cable tightness and consider cable replacement.
Issue 3: Frequent System Blue Screens
Solution: Update motherboard BIOS and GPU drivers; check power cable connections and replace the PSU if necessary.
Vertical GPU mounting enhances aesthetics but requires systematic optimization for cooling, power, and physical support. By choosing quality risers, improving thermal design, using professional brackets, and tuning software, performance degradation can be effectively mitigated. For users pursuing extreme performance, prioritize vertically compatible cases (e.g., GAMEMAX T20) and high-end GPU brackets (e.g., GAMEMAX GPU-192), with regular maintenance to ensure long-term stability. Ultimately, a vertically mounted GPU can maintain peak performance while becoming the centerpiece of your build.
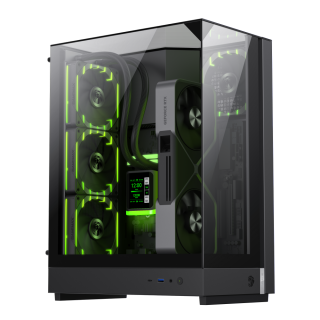
• Three-sided tempered glass offers a full, unobstructed view of your hardware.
• 90° rotated motherboard layout enhances airflow using the natural Stack Effect.
• Supports vertical GPU installation without a riser cable; compatible with NV50 series.
• Optimized for Back-to-Front (BTF) motherboards for clean, organized cable management.
• Space-efficient design supports 360mm liquid cooling, M-ATX motherboards, and SFX PSUs.
• Includes two ARGB PWM fans for dynamic, synchronized lighting effects.
• Metal nano nameplate adds a premium texture and sleek finish.

