

Your motherboard is the backbone of your computer, connecting all components and determining compatibility with upgrades like CPUs, RAM, and graphics cards. Knowing its model is essential for troubleshooting, upgrading, or understanding your system’s capabilities. Fortunately, there are several straightforward methods to identify your motherboard—whether you’re using Windows, macOS, or prefer checking hardware directly. Below is a step-by-step guide to help you find the information you need.
Windows offers built-in tools that quickly reveal motherboard details without third-party software.
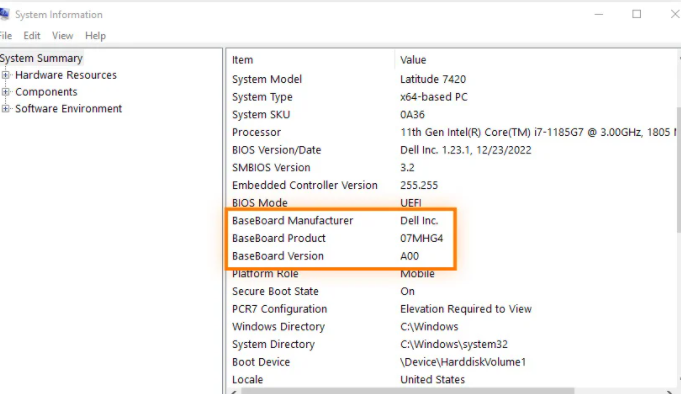
The System Information app provides a snapshot of your hardware. Here’s how to use it:
Press Win + R to open the Run dialog box.
Type msinfo32 and press Enter to launch System Information.
In the left pane, navigate to System Summary.
Look for entries like BaseBoard Manufacturer (your motherboard’s brand) and BaseBoard Product (its model number).
Note: If these fields are blank, try the next method—some manufacturers hide this data in System Information.
For a more direct approach, use command-line tools:
Open Command Prompt or PowerShell (search for them in the Start menu).
Type the following command and press Enter:
plaintext
wmic baseboard get product,Manufacturer,version,serialnumber
The results will display:
Manufacturer: Brand (e.g., ASUS, MSI, Gigabyte).
Product: Model number (e.g., B550-F Gaming).
Version: Revision or chipset info (e.g., 1.0).
If built-in tools fall short, trusted software can dig deeper into your hardware details.
CPU-Z is a lightweight, free tool that specializes in hardware analysis:
Download CPU-Z from the official website.
Install and launch the program.
Click the Mainboard tab. Here you’ll find:
Manufacturer, model, and chipset (e.g., Intel Z690 or AMD X570).
BIOS version and release date (useful for updates).
Speccy, by Piriform, offers a user-friendly interface with detailed system reports:
Download Speccy here.
Open the app and navigate to the Motherboard section in the left menu.
It will list the model, manufacturer, chipset, and even expansion slots (e.g., PCIe 4.0).
If your computer won’t boot or you prefer hands-on inspection, you can find the model directly on the motherboard itself.
Power off your computer and unplug it from the wall.
Open the case (refer to your PC’s manual for guidance—most use screws or latches).
Look for a label or printed text on the motherboard. The model number is often near the CPU socket, RAM slots, or along the edge.
Examples: “ROG STRIX B660-I GAMING WIFI” or “AORUS ELITE B550.”
Laptop motherboards are harder to access, but the model may still be visible:
Power off the laptop and remove the battery (if removable).
Check the bottom panel for a sticker listing the motherboard model (some brands include it here).
If not, you may need to remove the bottom cover (use caution—warranty may be voided). The model is typically printed near the memory or storage slots.
If you built your PC or bought it new, the motherboard’s model is likely in:
The original box (look for a label on the packaging).
The invoice or receipt (retailers often list component details).
The user manual (included with pre-built PCs or motherboard purchases).
Macs use custom motherboards, but you can still find relevant details:
Click the Apple menu () in the top-left corner and select About This Mac.
Click System Report.
In the left pane, under Hardware, select Model Identifier (e.g., “MacBookPro18,3”).
Search the identifier online (e.g., “MacBookPro18,3 motherboard”) to find technical specs, including the logic board (Apple’s term for motherboards).
Upgrades: Ensures compatibility with new CPUs (e.g., an LGA 1700 motherboard works with 12th/13th Gen Intel CPUs).
Troubleshooting: Helps find BIOS updates or driver fixes specific to your model.
Selling/Repair: Accurate details make it easier to describe your system or source replacement parts.
By following these methods, you’ll quickly identify your motherboard model and unlock valuable insights into your computer’s capabilities. Whether you use software, command lines, or physical inspection, the key is to cross-verify results for accuracy—manufacturers sometimes use similar model names, so double-checking ensures you have the right info.

