

In the realm of PC performance, every component plays a crucial role, and RAM is no exception. Overclocking RAM has become a popular method among enthusiasts and power users to squeeze out extra performance from their systems. This article will guide you through the process of overclocking RAM to enhance your PC's overall performance.
RAM, or Random Access Memory, is responsible for temporarily storing data that the CPU needs to access quickly. The speed at which RAM operates, measured in MHz, directly affects how fast the CPU can retrieve this data. By overclocking, you increase the frequency of the RAM, allowing it to transfer data at a higher rate. This can lead to improved performance in various tasks, such as gaming, video editing, and multitasking. For example, in gaming, faster RAM can reduce loading times and provide smoother gameplay, especially in games that are memory-intensive. In video editing, it can speed up the rendering process, saving you valuable time.
Before diving into the overclocking process, there are several important preparations to make:
Check RAM Compatibility: Not all RAM modules are created equal. Some are designed to handle overclocking better than others. Check the specifications of your RAM to see if it supports overclocking. Look for terms like "overclockable," "XMP (Extreme Memory Profile) support," or specific frequency ranges that indicate it can be pushed beyond the default settings.
Update BIOS/UEFI: The BIOS (Basic Input/Output System) or UEFI (Unified Extensible Firmware Interface) is responsible for initializing and configuring hardware components. Updating to the latest version ensures that you have access to the latest features and stability improvements, which are essential for successful overclocking. You can usually download the latest BIOS/UEFI update from the manufacturer's website of your motherboard.
Backup Important Data: Overclocking can sometimes lead to system instability, which may cause data loss. It's crucial to back up all your important files and data to an external storage device or cloud service before starting the process.
Cooling Considerations: Overclocking generates more heat, so proper cooling is necessary to keep the RAM and other components within safe temperature ranges. Ensure that your PC's cooling system, including fans and heatsinks, is functioning properly. If you're planning on significant overclocks, you might even consider upgrading your cooling solution, such as adding more fans or using liquid cooling for the CPU (which can also help with overall system temperatures).
Gather Necessary Tools: You'll need some software tools to monitor and test your overclocked RAM. Tools like CPU-Z can help you check the current RAM specifications, while MemTest86 and Prime95 are useful for testing stability.
Restart your computer and press the designated key (usually Del, F2, F1, or Esc) during the boot process to enter the BIOS/UEFI. The specific key may vary depending on your motherboard manufacturer, so refer to your motherboard's manual if you're unsure.
Once in the BIOS/UEFI, navigate to the memory settings section. This is often labeled as "Memory," "DRAM," or "Overclocking" depending on the motherboard's interface.
Many modern RAM modules come with XMP profiles. XMP is a technology that allows the RAM to run at pre-configured, overclocked frequencies. If your RAM supports XMP, simply enable the XMP profile. This is a quick and easy way to overclock without manually adjusting settings. You may have multiple XMP profiles to choose from, each with different frequency and timing settings. Select the one that suits your needs, but start with the lower one if you're unsure.
If you want to push the RAM further than the XMP profiles allow, you'll need to manually adjust the settings:
Adjust Frequency: Increase the RAM frequency incrementally. Start with a small increase, such as 100 MHz, and test for stability. Avoid large jumps as they can cause instability.
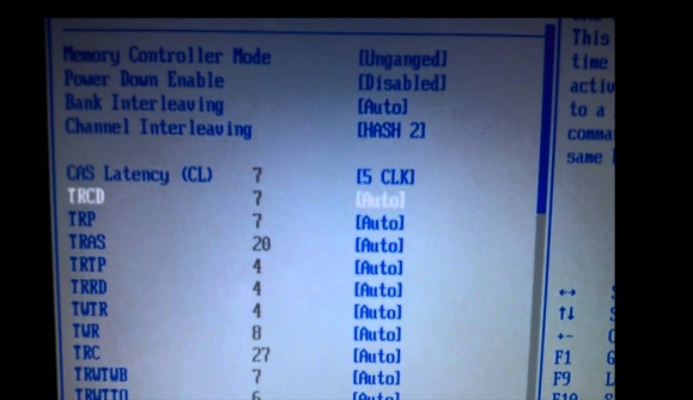
Set Timings: RAM timings, such as CAS latency (CL), RAS to CAS delay (tRCD), RAS precharge (tRP), and cycle time (tRAS), also affect performance. Generally, lower timings are better, but when overclocking, you may need to loosen the timings (increase the values) to maintain stability. Refer to your RAM's specifications for recommended timings at different frequencies.
Adjust Voltage: Increasing the voltage can help stabilize the overclock. However, this also increases heat generation, so be cautious. Only increase the voltage by small increments (e.g., 0.05V) and monitor the temperature. Never exceed the maximum voltage specified by the RAM manufacturer.
After making the adjustments, save the settings and exit the BIOS/UEFI. The computer will restart with the new RAM settings.
After overclocking, it's essential to test the stability of the system to ensure that the RAM is functioning correctly. Here are some common testing methods:
MemTest86: This is a widely used tool for testing RAM stability. It runs a series of rigorous tests to check for errors. Download MemTest86, create a bootable USB drive, and restart your computer from it. Let the test run for at least 4-6 passes. If any errors are detected, you'll need to adjust your overclock settings.
Prime95: While primarily used for testing CPU stability, Prime95 can also put a heavy load on the RAM. Run the "Blend" test, which stresses both the CPU and RAM, for several hours. If the system crashes or shows errors, your overclock is unstable.
Real-World Usage: Use your computer for typical tasks that you perform regularly, such as gaming, video editing, or multitasking. If you experience crashes, freezes, or blue screens, it's a sign that the overclock needs to be adjusted.
During the overclocking and testing process, keep an eye on the temperature of the RAM and other components. Software tools like HWMonitor can monitor temperatures in real-time. Ensure that the RAM temperature stays below 85°C (185°F) to prevent damage and maintain stability.
System Instability (Crashes, Freezes): If your system becomes unstable after overclocking, try reducing the frequency, loosening the timings, or decreasing the voltage. Start with small adjustments and retest for stability.
Failure to Boot: If the computer fails to boot after overclocking, reset the BIOS/UEFI to default settings. This can usually be done by removing the CMOS battery on the motherboard for a few minutes or using the reset button in the BIOS/UEFI.
Blue Screens of Death (BSOD): BSODs are often a sign of memory errors. Check the error code, which can provide clues about the issue. Common causes include incorrect timings or voltage settings. Adjust the settings accordingly and retest.
Overclocking RAM can be a great way to boost your PC's performance, but it requires careful preparation, patience, and testing. By following the steps outlined in this guide, you can safely and effectively overclock your RAM to enjoy better performance in your daily computing tasks and gaming sessions. Remember to always prioritize stability and safety, and never push your components beyond their limits. With the right approach, you can unlock the full potential of your RAM and take your PC's performance to the next level.

