A failing power supply unit (PSU) can lead to system instability, crashes, or complete hardware failure. Recognizing the signs of a failing PSU and testing it effectively is crucial for maintaining your PC's health. Here’s a guide on how to identify and test for PSU failure.
Random Shutdowns: If your computer shuts down unexpectedly, especially during high loads, this may indicate a failing PSU.
Boot Issues: Difficulty starting your PC, such as getting stuck on the boot screen or frequent restarts, can suggest power issues.
Unusual Noises: Any unusual sounds, such as clicking or buzzing, may indicate internal failure or component stress.
Overheating: If the PSU feels excessively hot or if the fan is not operating correctly, it could be failing.
Burning Smell: A burning smell coming from the PSU is a clear warning sign that it may be failing.

Multimeter: For measuring voltage output.
Power Supply Tester: A device designed specifically to test PSUs.
Screwdriver: For opening the case and accessing the PSU.
Before any testing, unplug your PC and inspect the PSU for any visible signs of damage, such as:
Bulging or leaking capacitors.
Burn marks or discoloration.
Dust buildup that may obstruct airflow.
A power supply tester is the easiest way to check if your PSU is functioning correctly:
Turn off and unplug your PC.
Connect the PSU cables to the tester according to the tester’s instructions.
Power on the tester. The display will indicate if the voltages are within the acceptable range.
If the tester shows any voltages outside the standard range (±5% for most rails), the PSU may be failing.
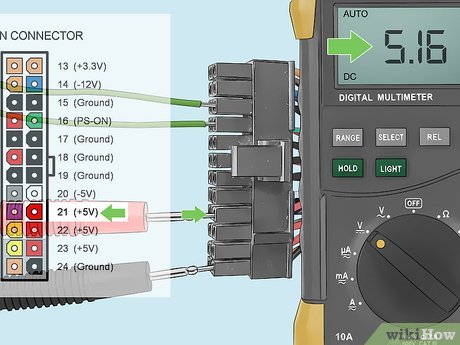
If you don’t have a power supply tester, you can use a multimeter:
Prepare the PSU: Turn off your PC, unplug it, and disconnect all cables from the PSU except for the main 24-pin connector.
Jump-start the PSU: Use a paperclip to short the green wire (PS_ON) and any black wire (COM) on the 24-pin connector. This will turn on the PSU without a motherboard.
Measure Voltages: Use the multimeter to check the voltage outputs from the connectors:
Ensure the readings are within ±5% of their rated values. If they’re not, the PSU is likely failing.
+3.3V rail: Orange wire
+5V rail: Red wire
+12V rail: Yellow wire
-12V rail: Blue wire
If possible, perform a load test to check how the PSU behaves under stress:
Reconnect your PC and ensure all components are connected.
Use benchmarking software (like Prime95 or FurMark) to stress your system.
Monitor stability: Watch for crashes, shutdowns, or instability during the test.
Ripple voltage can indicate a failing PSU, particularly under load. This requires an oscilloscope, so it's more advanced. If you're familiar with this tool, check the voltage for excessive ripple.
Testing your power supply for failure involves a combination of visual inspection, voltage testing, and load testing. If you suspect your PSU is failing, it’s crucial to address the issue promptly to prevent damage to other components. If you confirm the PSU is faulty, replacing it with a high-quality unit will ensure stable power delivery and enhance your system's overall performance. Always prioritize safety by unplugging your PC and being cautious while handling electrical components.