In recent years, RGB lighting has taken the world of PC building by storm. What was once a subtle addition has now become a bold statement, with users looking to personalize their builds to stand out. RGB cases are now a staple in the gaming and enthusiast PC market, allowing users to create custom lighting effects, set moods, and show off their unique style.
This guide will walk you through everything you need to know about installing and configuring RGB lighting in your PC case, ensuring you get the most out of your RGB components. Whether you’re aiming for a simple glow or a more complex, fully customizable lighting setup, we’ll cover the best methods to configure your system.
By the end of this guide, you’ll have the knowledge to transform your PC case into a visual masterpiece with dynamic RGB effects that not only add to the aesthetic appeal but also enhance the overall user experience.
Before diving into the installation and configuration, let’s briefly go over what RGB lighting actually is and why it’s such a popular feature in PC cases.
RGB stands for Red, Green, Blue, the primary colors of light. These colors can be combined in countless ways to create millions of different shades, allowing for fully customizable and vibrant lighting effects. RGB lighting is used not only for visual appeal but also for functionality—users can set different lighting patterns, sync them with music or games, and even use them to signal system status (e.g., changing colors when temperatures rise).
Customization: RGB lighting allows users to fully customize the look of their PC build.
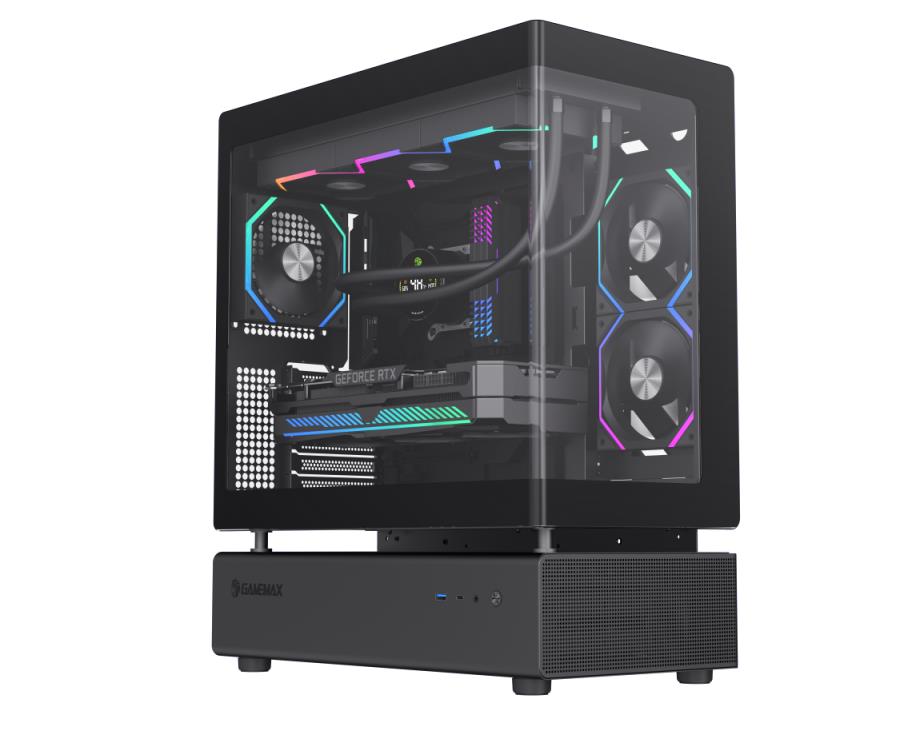
Aesthetics: Adding RGB lighting transforms a simple computer case into a vibrant piece of art.
Enhanced Atmosphere: Whether you're gaming, working, or streaming, the right RGB lighting can set the mood and enhance the overall experience.
Performance Indicators: Some RGB lighting setups can be integrated with system performance to change colors based on factors like CPU temperature or fan speed.
When setting up RGB lighting, the first step is to ensure you have the right components. Not all RGB lighting setups are the same, so it’s essential to understand which parts are needed.
RGB fans are one of the most common RGB components in a PC build. They serve the dual purpose of cooling your system while adding vibrant lighting effects. When selecting RGB fans, consider the following:
Fan Size: 120mm, 140mm, and 200mm are the most common sizes. Ensure that your case supports the chosen size.
Fan Count: Most cases come with 1-2 RGB fans, but if you want more lighting, you can add additional fans.
If you want to add lighting to areas of your case that aren't covered by fans, RGB strips are an excellent option. They are versatile and can be cut to the desired length for a custom fit. RGB strips can be mounted along the edges or behind the motherboard tray to illuminate the interior of your PC case.
Most RGB lighting components require a controller to sync and customize the lighting effects. Some motherboards come with built-in RGB headers, while others require a separate RGB controller that connects to your system.
Motherboard RGB Support: If your motherboard supports RGB, you can control lighting through software like ASUS Aura Sync, MSI Mystic Light, or Gigabyte RGB Fusion.
Standalone Controllers: These are useful if your motherboard doesn’t support RGB lighting. They allow for manual or software-controlled customization of the lighting effects.
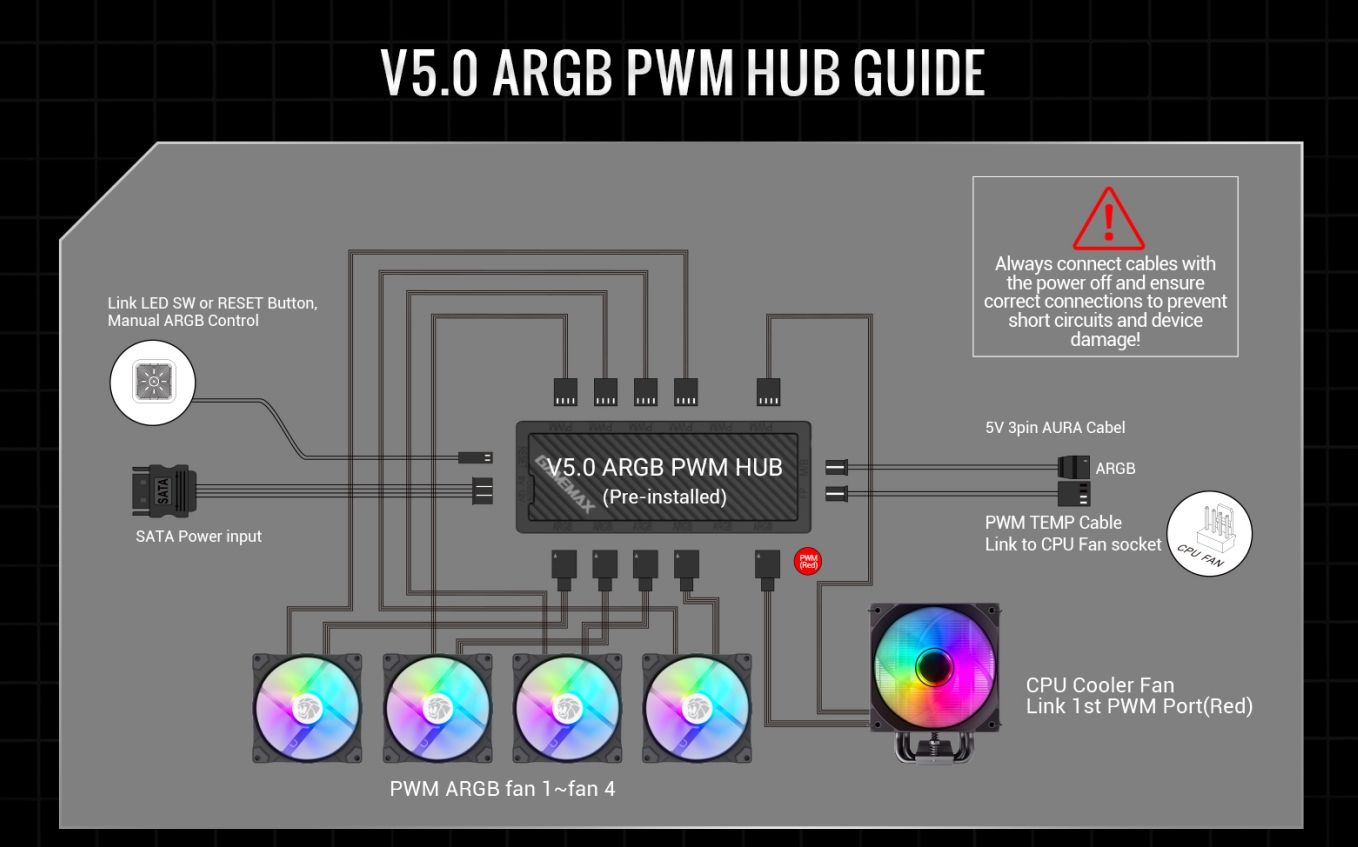
An RGB hub allows you to control multiple RGB components from a single point. These hubs often have multiple RGB headers, so you can connect fans, strips, and other components to the hub and control them through your motherboard or a software interface.
Once you have the necessary components, the next step is installation. Here’s a simple breakdown of the installation process:
Choose the right location: Typically, you’ll want to place intake fans at the front or bottom of the case and exhaust fans at the top or rear.
Mount the fans: Align the fans with the mounting holes in your case. For maximum airflow and aesthetics, ensure the fans are oriented correctly, with the RGB lighting facing outward.
Connect the RGB cables: Depending on the fan design, you’ll connect the RGB cables to either a RGB header on the motherboard or a separate RGB controller.
Measure the space: Decide where you want to install the RGB strips—usually along the edges or behind panels to highlight the components inside the case.
Peel and stick: Most RGB strips come with adhesive backing. Peel off the protective cover and stick the strip in place.
Connect the RGB cables: Attach the strip to the RGB header or controller.
Connect components to the controller: If you’re using a standalone RGB controller, plug in all your RGB fans, strips, and other components to the controller’s ports.
Connect to motherboard or PSU: Some controllers require a connection to the motherboard’s USB header, while others can be powered directly from the power supply unit (PSU).
Install software: If your controller or motherboard supports software control, install the appropriate software to manage the lighting.
Now that everything is installed, it’s time to customize your lighting. This is where the fun begins, as RGB lighting offers an almost endless range of effects and color choices.
If your motherboard has built-in RGB support, you can use the corresponding software to control your lighting:
ASUS Aura Sync: Provides a range of color effects, including static colors, breathing effects, and more.
MSI Mystic Light: Allows for RGB synchronization across multiple components and devices.
Gigabyte RGB Fusion: Offers a variety of customizable lighting effects and lets you sync lighting with game performance.
If you're using an external controller, you may have physical buttons on the controller to adjust lighting modes or connect it to a software interface via USB. The options might be more limited than motherboard-based solutions but still allow for impressive results.
Some RGB lighting setups can be linked to system metrics. This means that the RGB lighting will change color or pattern based on CPU temperature, GPU load, or other system statistics. For example:
Red for high temperatures
Blue for low temperatures
Pulsing effects for active workloads
This feature adds not only an aesthetic value but also an informative aspect to your build.
While configuring RGB lighting is fun, sometimes things don’t go as planned. Here are a few common problems and how to solve them:
Lighting not working: Ensure all cables are securely connected, and the RGB controller or motherboard header is enabled in the BIOS/UEFI.
Inconsistent colors: Check the RGB software settings to make sure the colors are properly configured. You may need to adjust the lighting modes or re-sync the devices.
RGB software not detecting components: Make sure that the software is compatible with your motherboard and that all drivers are up to date.
Installing and configuring RGB lighting is one of the most exciting aspects of building or upgrading a PC. Whether you're looking for a subtle glow or a dynamic light show, RGB lighting can add personality, style, and even utility to your PC build.
With the right RGB fans, strips, controllers, and software, you can create a personalized, visually stunning setup that perfectly matches your style and enhances your gaming or work environment. Don’t be afraid to experiment with different effects, colors, and layouts to make your PC case truly unique.